Blog

Voice Search

Is Your Business Ready for Voice Search?

Voice Search

It’s already obvious to most businesses that search engine optimization (SEO) is critical to business success. That’s because, being listed high in search engine results means a higher likelihood that consumers will go to your website and choose your company to do business with.

But what about voice search optimization? Is your business ready?

If you’re not familiar with the term, let’s start there before exploring how your business can prepare for this new wave of online searching.

What is a voice search?

Voice search simply refers to online searches (via sites like Google or Bing) that are carried out with a user’s voice. Think of someone driving in their car, looking for a place to have dinner. They may ask Siri, “What’s the closest Chinese food restaurant to where I am?” This is a voice search.

Why is voice search optimization important?

Alas, if you feel like you’ve only just begun to grasp the importance of SEO for text searches, strap in. The next new frontier is voice search optimization. It’s important because more and more people are doing it.

According to Andrew Ng, co-founder of Coursera, half of all online searches will be voice searches by 2020. While this has yet to be confirmed, there are certainly signs that the prediction is accurate.

For one thing, an increasing number of people are investing in smart speakers like Google Home, Apple HomePod, and Amazon Echo. Additionally, use of virtual assistants like Google Assistant, Alexa (Amazon), Siri (Apple), and Cortana (Microsoft) are being utilized more.

While voice search use rates aren’t sky-high quite yet (a recent study found that 21% of respondents used voice search on a weekly basis), experts estimate that they soon will be.

What does this mean for your business?

At this time, it’s not necessary to put all of your efforts and marketing funds into voice search optimization. Furthermore, many of the things you’ve ideally already done to optimize your business for text searches will also help when it comes to voice searches.

Still, there are several key things that are unique to voice searches and voice search optimization:

  • Only “position zero” gets the spotlight. With a regular Google text search, search result position 1 (“position zero”) is best, but positions 2, 3, and 4 are still pretty good. When it comes to voice searches, however, Sir or Alexa will only read the first search result, which means you won’t even be seen if you’re in position 2 or beyond.
  • People use longer key phrases and questions with voice search. While a user might type “best dentist Denver” into Google Search, they might vocally ask Google Assistant: “Who is the best dentist in Denver?” This means you must optimize your content for both text and voice search key phrases.
  • There are several core inquiries that voice searchers will continually ask. Think about who usually voice searches and when. Often, it’s in situations where typing isn’t possible (e.g., while driving) or when the user wants one simple answer (e.g., “What time does the post office open?”) In these cases, businesses must first ensure the accuracy of their location information (address, phone number, hours, etc.). Second, they must optimize their content for quick and succinct answers to their most commonly asked questions.

As you can see, it’s wise to at least take some preliminary steps right now in order to ensure a seamless transition into the soon-to-be world of prevalent voice searching. This starts with assessing your company’s current voice search status and speaking with SEO professionals who can help optimize your content for voice search.

Is Your Business Ready for Voice Search? Read More »

Screen Shot 2019 05 22 at 7.19.41 AM

How to Share Screens with Microsoft Teams

Microsoft Teams is an amazingly powerful collaboration tool that’s available as a part of the Microsoft Office suite.
At its core, it’s kind of like Slack on steroids, but that core functionality is just the tip of the iceberg. Because it’s integrated with the rest of Microsoft Office, it has so many powerful features.

One feature area in Microsoft Teams is the ability to host and join virtual meetings. Users can join or host meetings from desktop or mobile. Mobile users can share files with the group, and we covered that in a previous post. Desktop users can share screens with other users, and with a surprising degree of control. Here’s how to take advantage of this feature.

Step 1: Create a Meeting

The Share Screens feature works from within the Meetings function, so the first step is to create or join a meeting. Locate the tabs bar (usually on the left side), where you’ll see icons like Activity, Chat, Teams, Meetings, and Files. Select Meetings, and then create a meeting (or join a meeting that someone else is hosting). The Meetings tab is tied into your Outlook calendar, allowing you to see potential conflicts.

Quick note: Teams features can be enabled or disabled at the enterprise level. If you don’t see a Meetings tab at all, your IT department hasn’t enabled it yet. Contact IT and plead your case for enabling this awesome feature.

Step 2: Click the Share Button

Once the meeting is in progress, you’ll see a series of buttons in the bottom middle of your screen. If you don’t see them, move your mouse to that location to make them show up. You’ll see buttons for video (if enabled), microphone (for muting yourself), ending the call, and more. The one you want looks like a rectangle with an upward arrow. This button, aptly named the Share button, represents screen sharing. Click it to continue.

Step 3: Choose What to Share

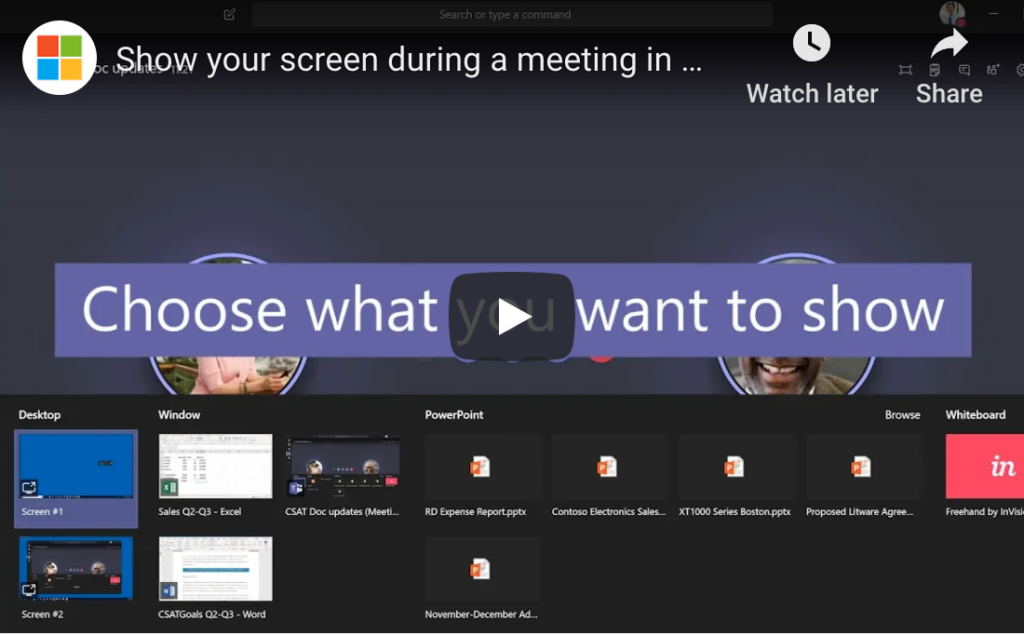
Screen sharing isn’t exactly new technology, but the implementation here is particularly well done. When you click the Share button, Teams doesn’t immediately share your entire screen. Instead, you have options. “Desktop” allows you to share one of your desktops. “Window” lets you choose a single window or app to share. “PowerPoint” shares the presentation you choose. There are even more options available under “Browse”.

Conclusion

This level of granular control makes screen sharing in Teams a killer feature, and there’s so much more that Teams can do for you. Team-based chat, productivity tools, and real-time collaboration on nearly any Office file are a few more ways it can help. If you’re ready to keep exploring, contact us to keep learning.

Microsoft Teams

How to Share Screens with Microsoft Teams Read More »

GettyImages 996576002

How To Make Awesome Slides In Microsoft PowerPoint

Microsoft PowerPoint is the industry leader in presentation software, a venerable application that’s over 30 years old. Awesome PowerPoint slides can greatly enhance the visual impact of a meeting presentation. The inverse is also true: terribly designed PowerPoint slides can create serious distraction and disinterest. Many a speaker has been undermined by his or her slides.

Today’s tech tip will teach you how to make your Microsoft PowerPoint slides awesome. View online here or watch the video below.


Step 1: Choose a Theme

PowerPoint offers a variety of prebuilt themes. Choose one that fits the tone of your presentation and your company. To do so, open PowerPoint and click the Design tab in the menu ribbon. One of the sections is named Themes. Click on a theme to apply it to the default slide. Don’t like it? Try another.

PowerPoint also allows you to find additional themes online. Click the drop-down arrow in the Themes pane and select “Browse for Themes…” to start that process.

Bonus tip: If you have a presentation that’s already filled with content, you can still experiment with changing the look by changing themes. Changing themes never removes or erases existing content, though it will change fonts and sometimes reposition text.

Step 2: Insert Your Raw Data

Whether you’re typing all your content in manually or pasting it in from another document, now’s the time to get the raw data into your file. Don’t worry very much about looks at this point. Just get the information in there.

If you’re working in a theme, remember to right-click on each new slide and select the appropriate layout. Placing content into slides with the proper layout now will save you headaches later.

Bonus tip: Not all themes have the same set of slide layouts available. Make sure the theme you choose has all the ones you need.

Step 3: Check Out Design Ideas

A new feature in Office 365, Design Ideas is a powerful, AI-assisted tool. It will dynamically analyze the contents of a slide and suggest a handful of alternative ways of displaying the information. It’s truly marvelous when it works just right (for example, turning a bulleted list into a sleek timeline), and you have to see it in action to fully appreciate it.

To access Design Ideas, click on the Design tab in the menu ribbon. At the far right, you’ll see a Design Ideas button in the Designer section of the ribbon. Click this button to open a sidebar. You may see “Generating design ideas…” for a few seconds. Next, a handful of design ideas will appear. Click through them and select the one that works best for you.

Using Design Ideas is the easiest way to create awesome, powerful PowerPoint presentations. Check it out today!

Powerpoint Presentation

How To Make Awesome Slides In Microsoft PowerPoint Read More »

GettyImages 948476182

How to Stop Spam from Ever Hitting Your Inbox

Spam Emails

Spam emails can be incredibly annoying. Not only that, it can be downright dangerous, considering the phishing schemes and other email scams that are prevalent today. We can’t avoid spam completely and hope to have any kind of digital life, because so many services require an email address as part of the sign-up process. These can tend to clutter our inboxes with (technically not spam) promotional emails, and the less scrupulous of these may send real spam. That’s not to mention the frequency with which these companies’ databases are breached, creating a whole new layer of spam potential.

How to Avoid Seeing Spam

All of the most prevalent email services offer some degree of spam protection. Great spam protection is one of the reasons Gmail rose to such prominence a decade ago. Most services enable spam filtering by default, but check your email service’s settings to ensure that this setting is turned on.

If you’re still seeing a lot of spam, or if you’re using a service that doesn’t offer much in the way of spam filtering, here are some other suggestions.

Create Filters or Rules

You can create your own rudimentary spam filter by setting a filter or a rule. The terminology varies based on your email service, but you should find something by a similar name. You can create rules that auto-route email based on certain characteristics. For example, you can create a rule that sends any message containing NSFW language straight to the trash. Simply insert all those explicit terms in the field “message contains” and select “move to trash” as the action that is taken.

You can use filters or rules to move less important messages to a folder, too. If you still want to know about the latest sales at a few retailers, but you don’t want to be inundated right alongside emails that are actually important, create a rule that sends these emails to a “Retail” folder that you can check when you get the shopping urge.

Block Addresses

In the same area of settings, you should also have the option to block specific email addresses or even all addresses from a particular domain. Granted, it’s rare these days for spammers to frequently reuse the same address, but this function can still help with overly persistent individuals as well as companies or domains that refuse to take you off their mailing lists.

How to Stop Spam from Ever Arriving

There are other tools available to stop spam from ever showing up in your inbox.

Use “Report Spam” Button

The spam filters from email services like Gmail aren’t static. They can actually learn from you. When a spam message leaks through, you can help the spam filter learn. Look at the menu options available on the message. You should see one that looks like a stop sign with an exclamation point. Click this button to report to Gmail that the message is spam, and you should never see a similar message again.

If Gmail recognizes that your spam message is actually from a mailing list, it will try to unsubscribe for you if you click that option.

Set Up a Spam or Throwaway Account

Another savvy way to avoid spam is to set up a “spam account” that you use only for email signups, website logins, and the like. Give your main email address only to those personal and professional contacts you actually want to hear from, and sign up for everything else using your “spam account.”

If your current account is beyond hope, turn it into your spam account. Create a new main account, and let all your real-life contacts know about the switch.

These tips should help cut down on the chaos in your inbox. Got your own tips? Let us know!

How to Stop Spam from Ever Hitting Your Inbox Read More »

GettyImages 641081596

What Are Google’s Local Guides?

Google Local Guides

Local Guides have contributed content about hundreds of thousands of businesses. They get together and have held meetups and conducted projects in Europe, India, South America, North America, Australia, and Asia.

How Are Google’s Local Guides Different From Google Users?

People have been contributing reviews, photos, and videos to Google for years. Google Local Guides are part of a program that offers benefits provided through Google Maps.

The Local Guides provide a way for Google to improve its maps and local business information. Local Guides can post photos, reviews, and answer questions about businesses — all tied to Google Maps.

What Do Google Local Guides Get From Contributing?

The Local Guides program offers a rewards program for participants. The points-based program offers a way for guides to get points for contributing nine different kinds of information based on their local area.

The types of information and points include:

  • Answers: 1 point
  • Edits: 5 points
  • Fact Checks: 1 point
  • Photos: 5 points
  • Places: 15 points (for places and roads)
  • Q & A Answers: 3 points
  • Ratings: 1 point
  • Reviews: 10 points, plus additional 10 points for reviews over 200 words
  • Videos: 7 points

Guides advance through the point system. They start at Level 1 and can achieve Level 10. People using Google Maps can see the Guide’s level and use it to decide the trust level and authenticity of the information.

What Other Benefits Do Local Guides Get?

Local Guides have access to perks from Google’s partners and also get early access to Google features. They can also get badges and recognition from other Google Maps users.

Google Local Guides have profiles that display badges and recognition. Recognition from users shows next to the Guide’s level on their profile.

How Do Local Guides Level Up?

Local Guides advance through Levels by accumulating points from their contributions. Level 1 Guides are just starting out. They have 0 points. By Level 2. guides have achieved 15 points.

Here are the other Local Guide levels and points needed to achieve them:

  • Level 1: 0 points
  • Level 2: 15 points
  • Level 3: 75 points
  • Level 4: 250 points and a badge
  • Level 5: 500 points and a new badge
  • Level 6: 1,500 points and a new badge
  • Level 7: 5,00 points and a new badge
  • Level 8: 15,000 points and a new badge
  • Level 9: 50,000 points and a new badge
  • Level 10: 100,000 points and the highest badge

Level 10 is a high level of achievement requiring many contributions over a significant period. As of 2018, members of the Local Guide community identified over 500 Level 10 Local Guides around the world. The number of Local Guides of different levels in each area shows on each Local Guide’s profile.

How Do You Become a Google Local Guide?

Anyone with a Google account can visit the Local Guides page and choose “Join Local Guides” to get started. Provide your home location and confirm the details, and then sign up.

What Are Google’s Local Guides? Read More »

Call Now Button